Bass response in my listening measured -7dB @ 50Hz and +7dB @ 100Hz. That was the best I could get after installing 4 layers thick of RPG acoustic foam and rearranging the room. I wanted to smooth it out and the only ways left were bass traps or tube traps. The main difference between these is that bass traps have narrow bandwidth, tube traps have wide bandwidth. That is, bass traps make a bigger difference at a particular frequency and don't do much else. Tube traps have a more subtle effect, but it is spread across a broad frequency range. Since I needed to fix a 2 octave range (call it 45 Hz to 180 Hz), I opted for tube traps.
I called ASC and spoke with a chap named Ty. He was helpful in explaining some practical guidelines for using tube traps. For example, don't bother with the smaller ones - stick with 16" diameter and larger. Also, they affect transients more than steady state, so don't expect to measure a big difference on slow frequency sweeps. But MATT (musical articulation test tones) will show a marked improvement. Placement matters: corners for full wave, wall half-way points to catch the harmonic, etc. More is generally better, and use full rounds floor to ceiling height where possible.
Based on that I decided my listening room needed dual tube trap towers, 20-24" diameter, 7' tall (floor to ceiling), each using 1.5" thick fiberglass, one in each rear corner (the front corners - behind the speakers - were already open due to the design of the room). The next question was: build or buy?
I looked at ASC's
prices.
This simple setup would be one 4' plus one 3' in each corner.
Cost: ($1046 + $918) * 2 = $1964 * 2 = about $4000, plus tax or shipping.
I did a little research and found two web sites describing how to build your own tube traps:
http://www.teresaudio.com/haven/traps/traps.html
and
http://home.comcast.net/~jtgale01/diy2.htm.
Based on this, I could build the same thing for less than 10% of the cost.
Fiberglass
The hardest thing to find was the fiberglass insulation - semi-rigid industrial pipe insulation. Ideal would be to find preformed circular sections 3' to 4' long. But this I could not find anywhere. I could only find 30' long rolls, either 3' or 4' wide, that had to be custom cut to whatever size you want. I purchased a 30'x4'x1.5" roll of Johns Manville Micro-Flex semi rigid large diameter pipe and tank wrap. From a local dealer it cost about $240 tax and all. The roll fit in the back of my Subaru Forester.
Little did I know at the time how much extra work this would be compared to preformed circular sections...
Everything Else
Other materials:
End caps: 1/4" thick MDF sheets, 2'x4', each sheet makes 1 pair of end caps (times 4 for 4 tubes)
Glue: Liquid Nails Heavy Duty caulking glue, 5 tubes
Gloves: for handling the fiberglass; went through 8 pair of disposable gloves
Fabric: for covering the tubes: 4 yards per tube (double-thick wrap) = 16 yards of 4' wide muslin
Tape: several rolls of packing tape used for forming & gluing
Tools: razor knife, razors, circular forms, tape measure, markers, weights, etc.
Total cost of everything was between $300 - $350, of which most ($240) was the fiberglass.
End Caps
I made the end caps first, since they define the diameter of the tubes, which determines the shape of the sections of fiberglass that need to be cut. Somehow, I needed to draw perfect circles 20-24" in diameter. I ended up using a piece of kite string, a thumbtack, and a pencil. This worked great and I got 8 circles all perfectly round and of the same size.
Next step was to cut out the end caps. I used a small sabre saw to carefully, manually, slowly, cut each one. Touched up with sandpaper to smooth the edges. It took several hours to cut out all 8 end caps.
Fiberglass Cylinders
First, I took the measurements. Each end cap was 21" in diameter (the largest I could get in the room without bumping into other stuff near the corners). That means the outer diameter of the fiberglass should be pi x 21" = 66". Now for the width: this would depend on the width of fabric I could get. I found that the widest fabric I could find was 48", and I needed a few inches extra on each end to staple the fabric to the end caps, and the floor to ceiling was 7'. So I used 40" width of fiberglass - the sheet for each tube would be 40" x 66".
The next step was to cut sheets from the fiberglass roll, then form each into a cylinder and glue it along the seam.
This entire step could be skipped if one started with preformed fiberglass sections instead of a roll.
Key problems were:
I did the first through simple "measure twice cut once". The caveat was measuring a 1.5" thick sheet of fiberglass is inexact as the edges are soft, so you have to guess at how accurately and consistently you are measuring the edges. NOTE: the fiberglass has a thin fabric/aluminum foil wrapper; this goes on the OUTSIDE of each tube.
I did the second by wrapping several long strips of packing tape across the freshly glued seam. Each went about 1/2 way around the tube, with about 7 strips along each seam. I used a liberal amount of glue with a zig-zag pattern along the inside of the seam, then after applying them together smeared the excess along the seam inside the tube. I put the tubes out in the shed for a couple of days for the glue to dry.
Connecting the End Caps
Now I've got fiberglass cylinders but they aren't perfectly round. The fiberglass is flexible and can be pushed into a round shape, but there is nothing to hold it that way. The end caps are perfectly round, so how to keep the fiberglass round to glue it to the end cap, and hold it that way as the glue dries?
I used flexible vinyl hose to do this. I bent the hose into a circle and cut it to the exact length needed to insert inside the fiberglass. The snug fit pushes out on the fiberglass and helps hold it in a circular shape. Then I glued on the end cap, using a generous fat zig-zag pattern of glue and rotating the end cap about 1/8 turn as I pressed it down to spread the glue evenly. It still wasn't perfectly round - the fiberglass wanted to form straight sections. So I wrapped packing tape tightly around the fiberglass around the end cap. The combination of the hose on the inside, and packing tape on the outside, held it close enough to a circle as the glue dried. I put a 10# weight in the center of the end cap to hold it down firmly as the glue dried.
Of course, this won't work for the other end cap - I can't leave a vinyl hose inside the tube trap.
To connect the other end cap I could only use tape on the outside but nothing on the inside pushing out against the tape.
This turned out OK for two reasons:
Then I put a weight on this end cap and let it dry for a couple of days.
Skinning the Tubes
Next job was to remove the thin outer fiber/metallic shell on the tubes, exposing the naked fiberglass. I left one section of this skin attached so it can be used to reflect mid-high frequencies. I sized this section 1/4 of the surface area: halfway around the tube, along the upper (or lower) half.
This job was painstaking: using a razor to cut just through the skin, but not into the fiberglass. Then peeling the skin back like a banana. But the fiberglass tries to stick to the skin. So I used a razor to cut off strands of fiberglass from the skin as I peeled it back. It reminded me of skinning a rabbit or deer, but the result is not a tasy meal, but tasty sound :) - at least I hoped! Along the seam and end caps this was difficult as the skin got into the glue. It took a full day to get this done on all 4 tubes.
Covering the Tubes
The final job was to cover the tubes.
First I cut the 16 yards of 48" wide Muslin fabric into 4 yard sections and ironed it.
Next I anchored the fabric to the tube along the back side (opposite the reflecting panel).
And stretched it along each end cap, stapling as I went, to keep the fabric tight and smooth.
I wrapped each twice - double thick:
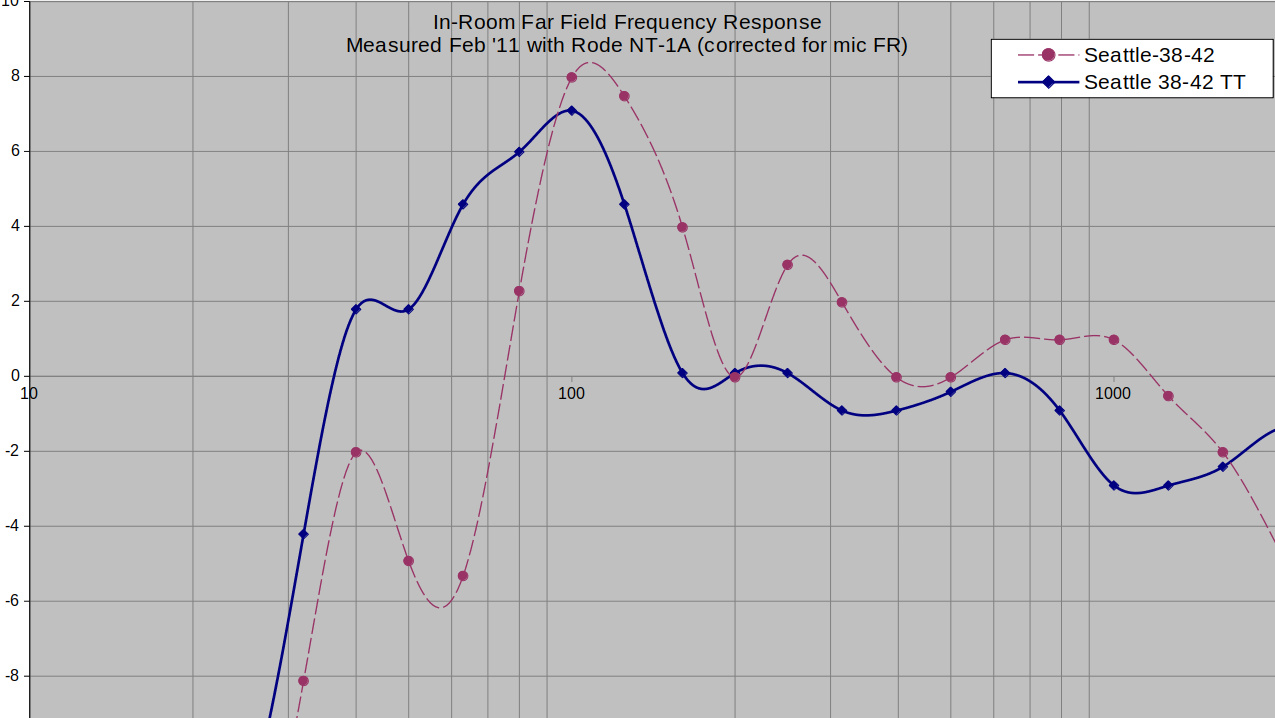
Measurements: the graph shows they made a big difference in bass below 100 Hz,
and smoothed response up to around 700 Hz.
This is on steady state continuous signals, and doesn't tell the whole story. They cleaned up the MATT signal (faster more even spectral decay, transient response) even more.
Here's a more recent in-room response curve, showing further improvements from parametric EQ:
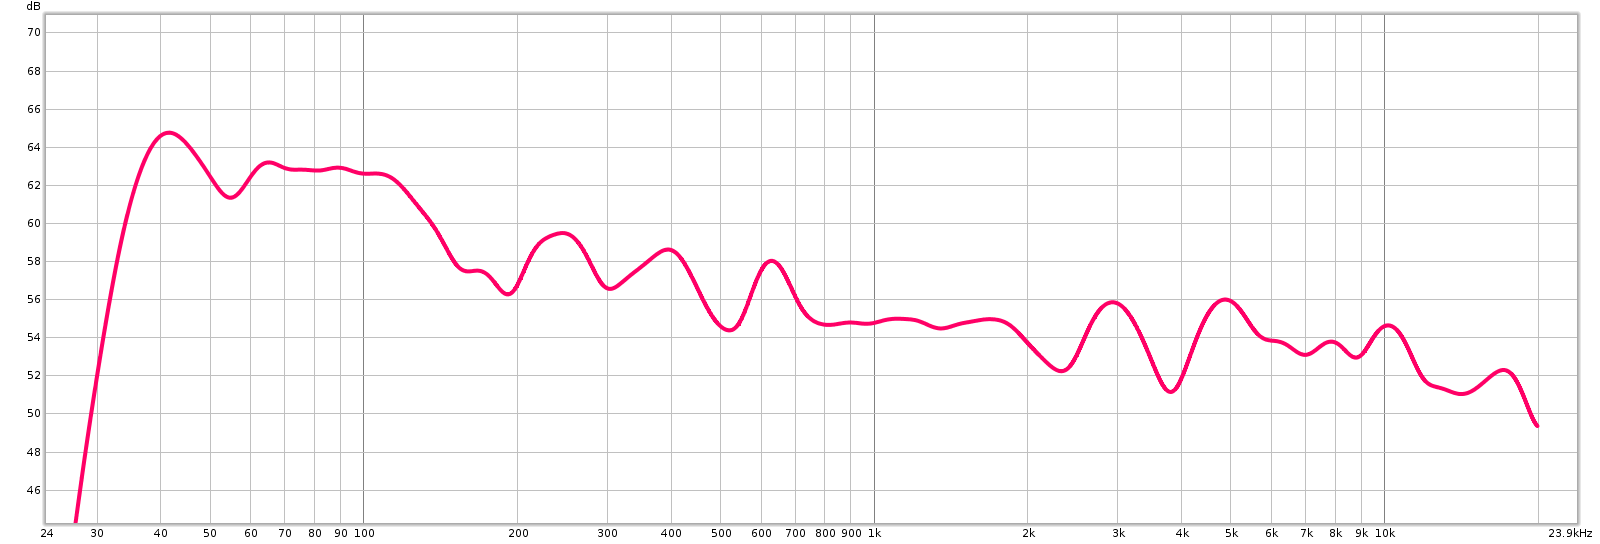
In perspective, this is pretty good for in-room far-field actually measured response from the listener position. Given the treatments I have, what I've got now may be the best possible in a room of this size.
The improvement is quite noticeable but it is not the jaw dropping night & day experience that some people describe. I think those people are getting excited and letting their enthusiasm get away with them.
Overall, the traps make the sound from the Mag 3.6/R closer to what I hear on my headphone system, but still different enough. The Mag 3.6/R still have better midrange resolution than that setup and are less forgiving of bad recordings. But it is more forgiving than it was.
Overall it's an improvement to the sound that is subjectively audible and consistently measurable. The steady-state FR measurements don't do it justice. That said, given the effort, I hoped for more. But it was an educational project and at least I didn't blow $4000+ on it.